Note: 10x Genomics does not provide support for community-developed tools and makes no guarantees regarding their function or performance. Please contact tool developers with any questions. If you have feedback about Analysis Guides, please email analysis-guides@10xgenomics.com.
Cell Multiplexing (or cell hashing) is a method for pooling samples using sample-specific molecular tags. These tags help identify transcripts that originate from the same donor sample. Cell Multiplexing offers several advantages, including:
- Increased sample throughput in a single experiment
- Increased number of cells assayed in a single experiment
- Increased number of possible replicates in a single experiment
- Detection of cell multiplets and their removal before analysis
5' Cell Multiplexing is possible with hash antibodies carrying custom oligos. Details on how to multiplex samples using the 5' Immune Profiling kit are provided in this Knowledge Base article.
This article is a step-by-step guide on using Cell Ranger to demultiplex samples after the multiplexed libraries have been sequenced. Additionally, we demonstrate how to analyze per sample data using cellranger multi. Please note that the 5' demultiplexing software pipeline is not officially supported by 10x Genomics. Versions of Cell Ranger older than v7.0.0 do not support this analysis; it is advisable to use the latest version whenever possible.
The 5' Chromium Next GEM Single Cell Immune Profiling cell hashing assay workflow is considered compatible with minimal testing, and its corresponding software analysis is enabled but unsupported. 10x Genomics does officially offer 3' CellPlex as a Cell Multiplexing solution for 3' libraries.
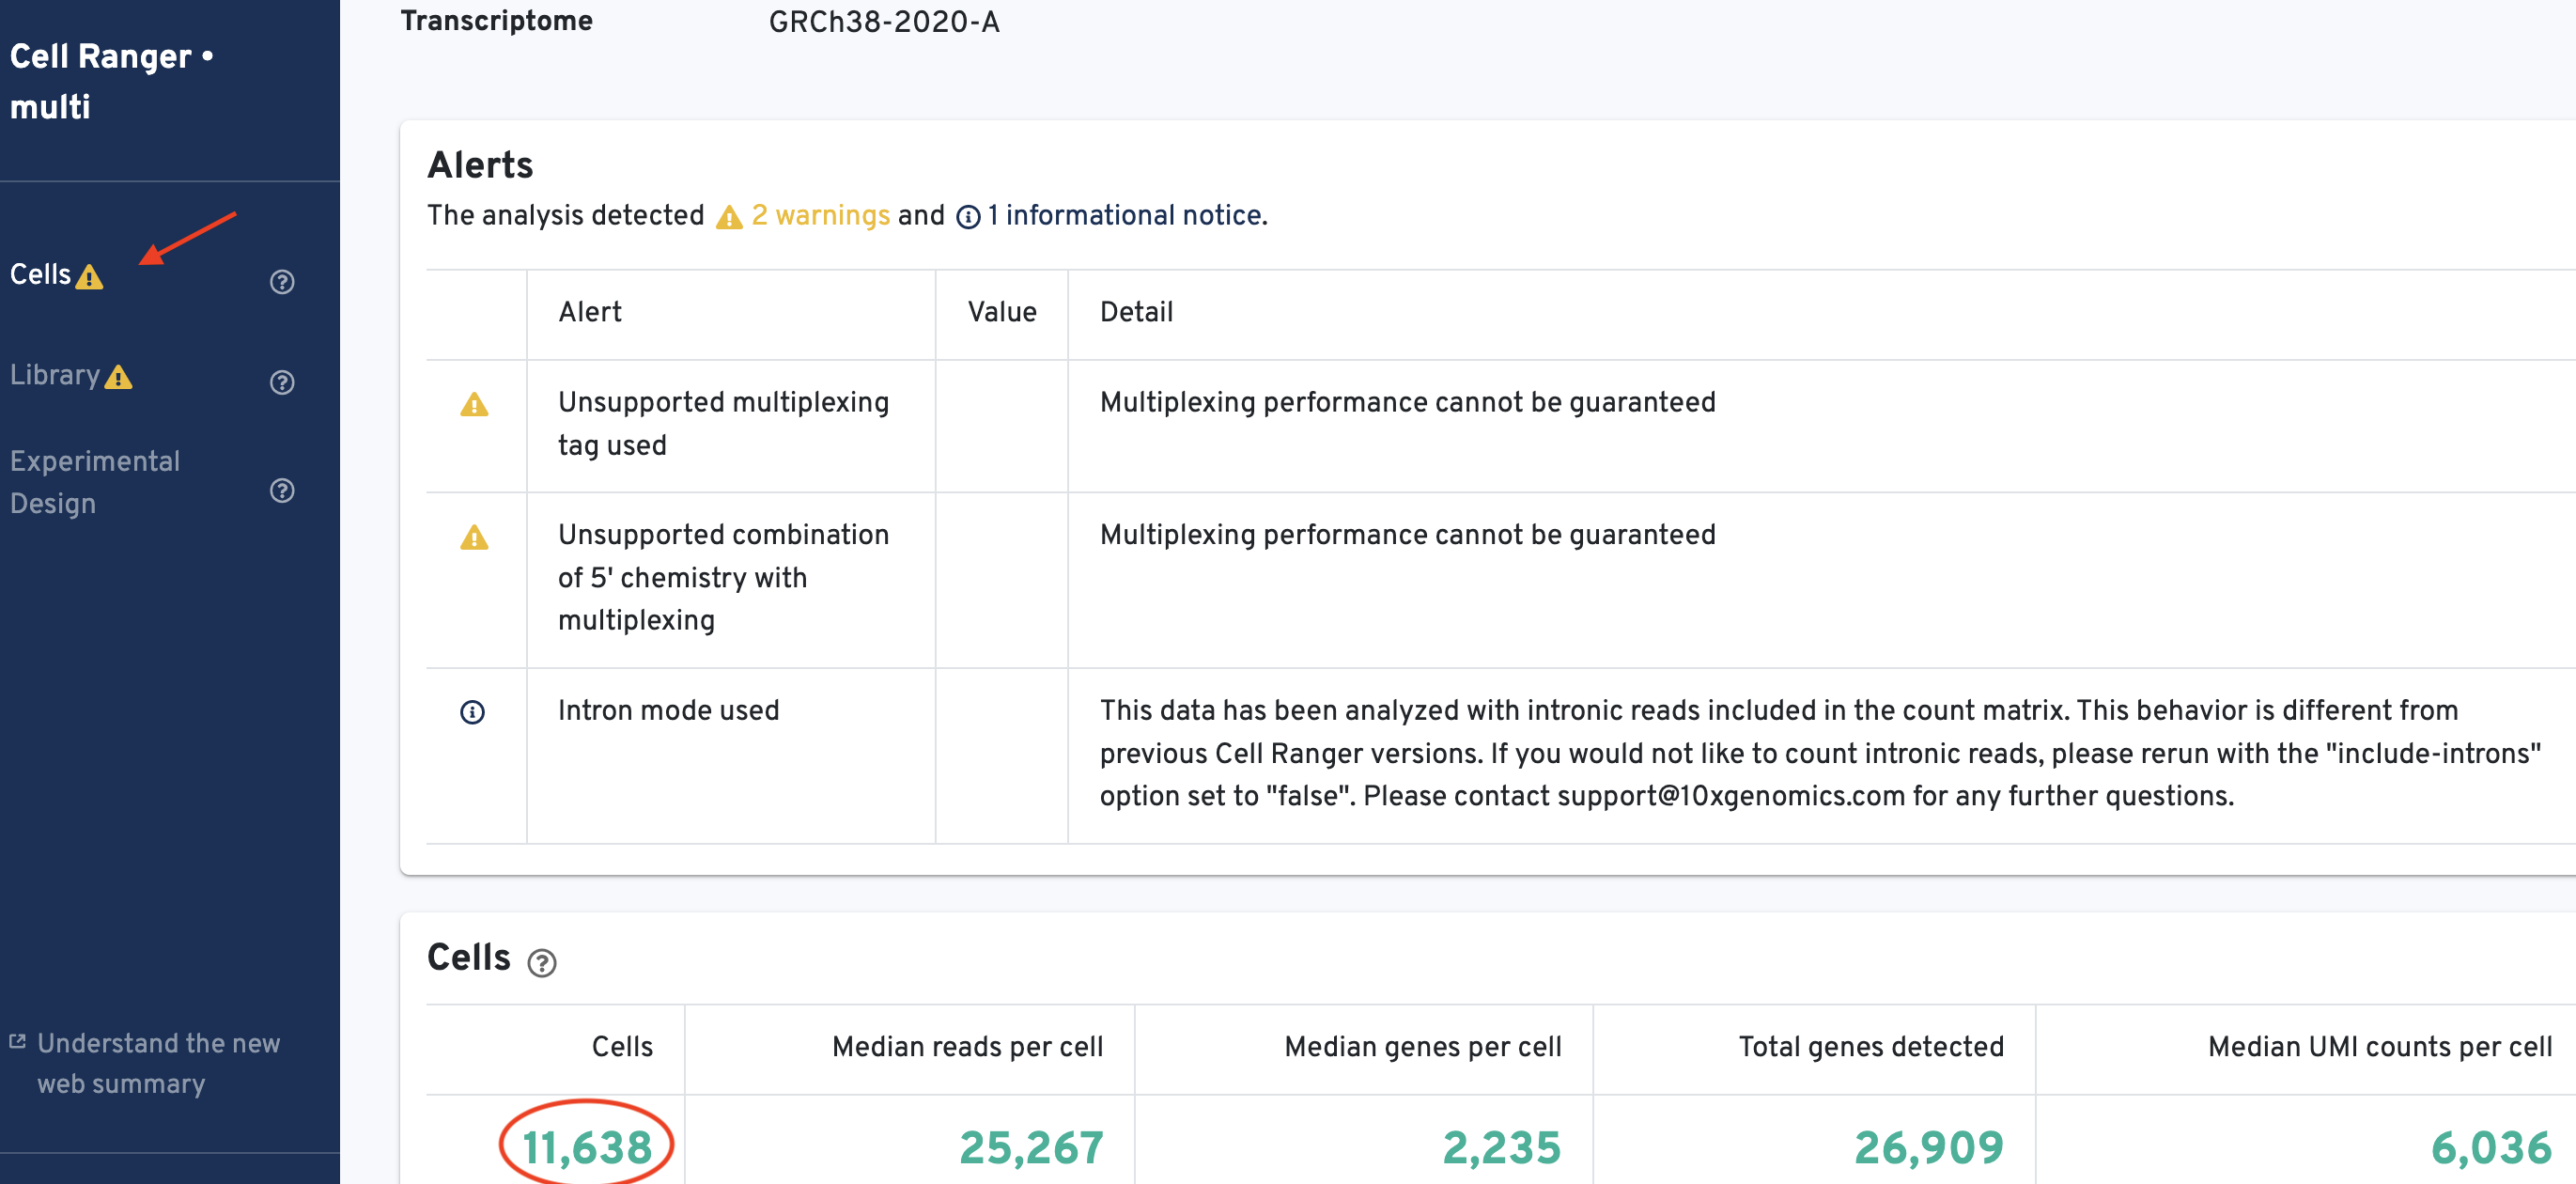
Since the combination of 5' chemistry with multiplexing is not officially supported, the web summary generated as a result of running this analysis is expected to show a few warnings and alerts (described below).

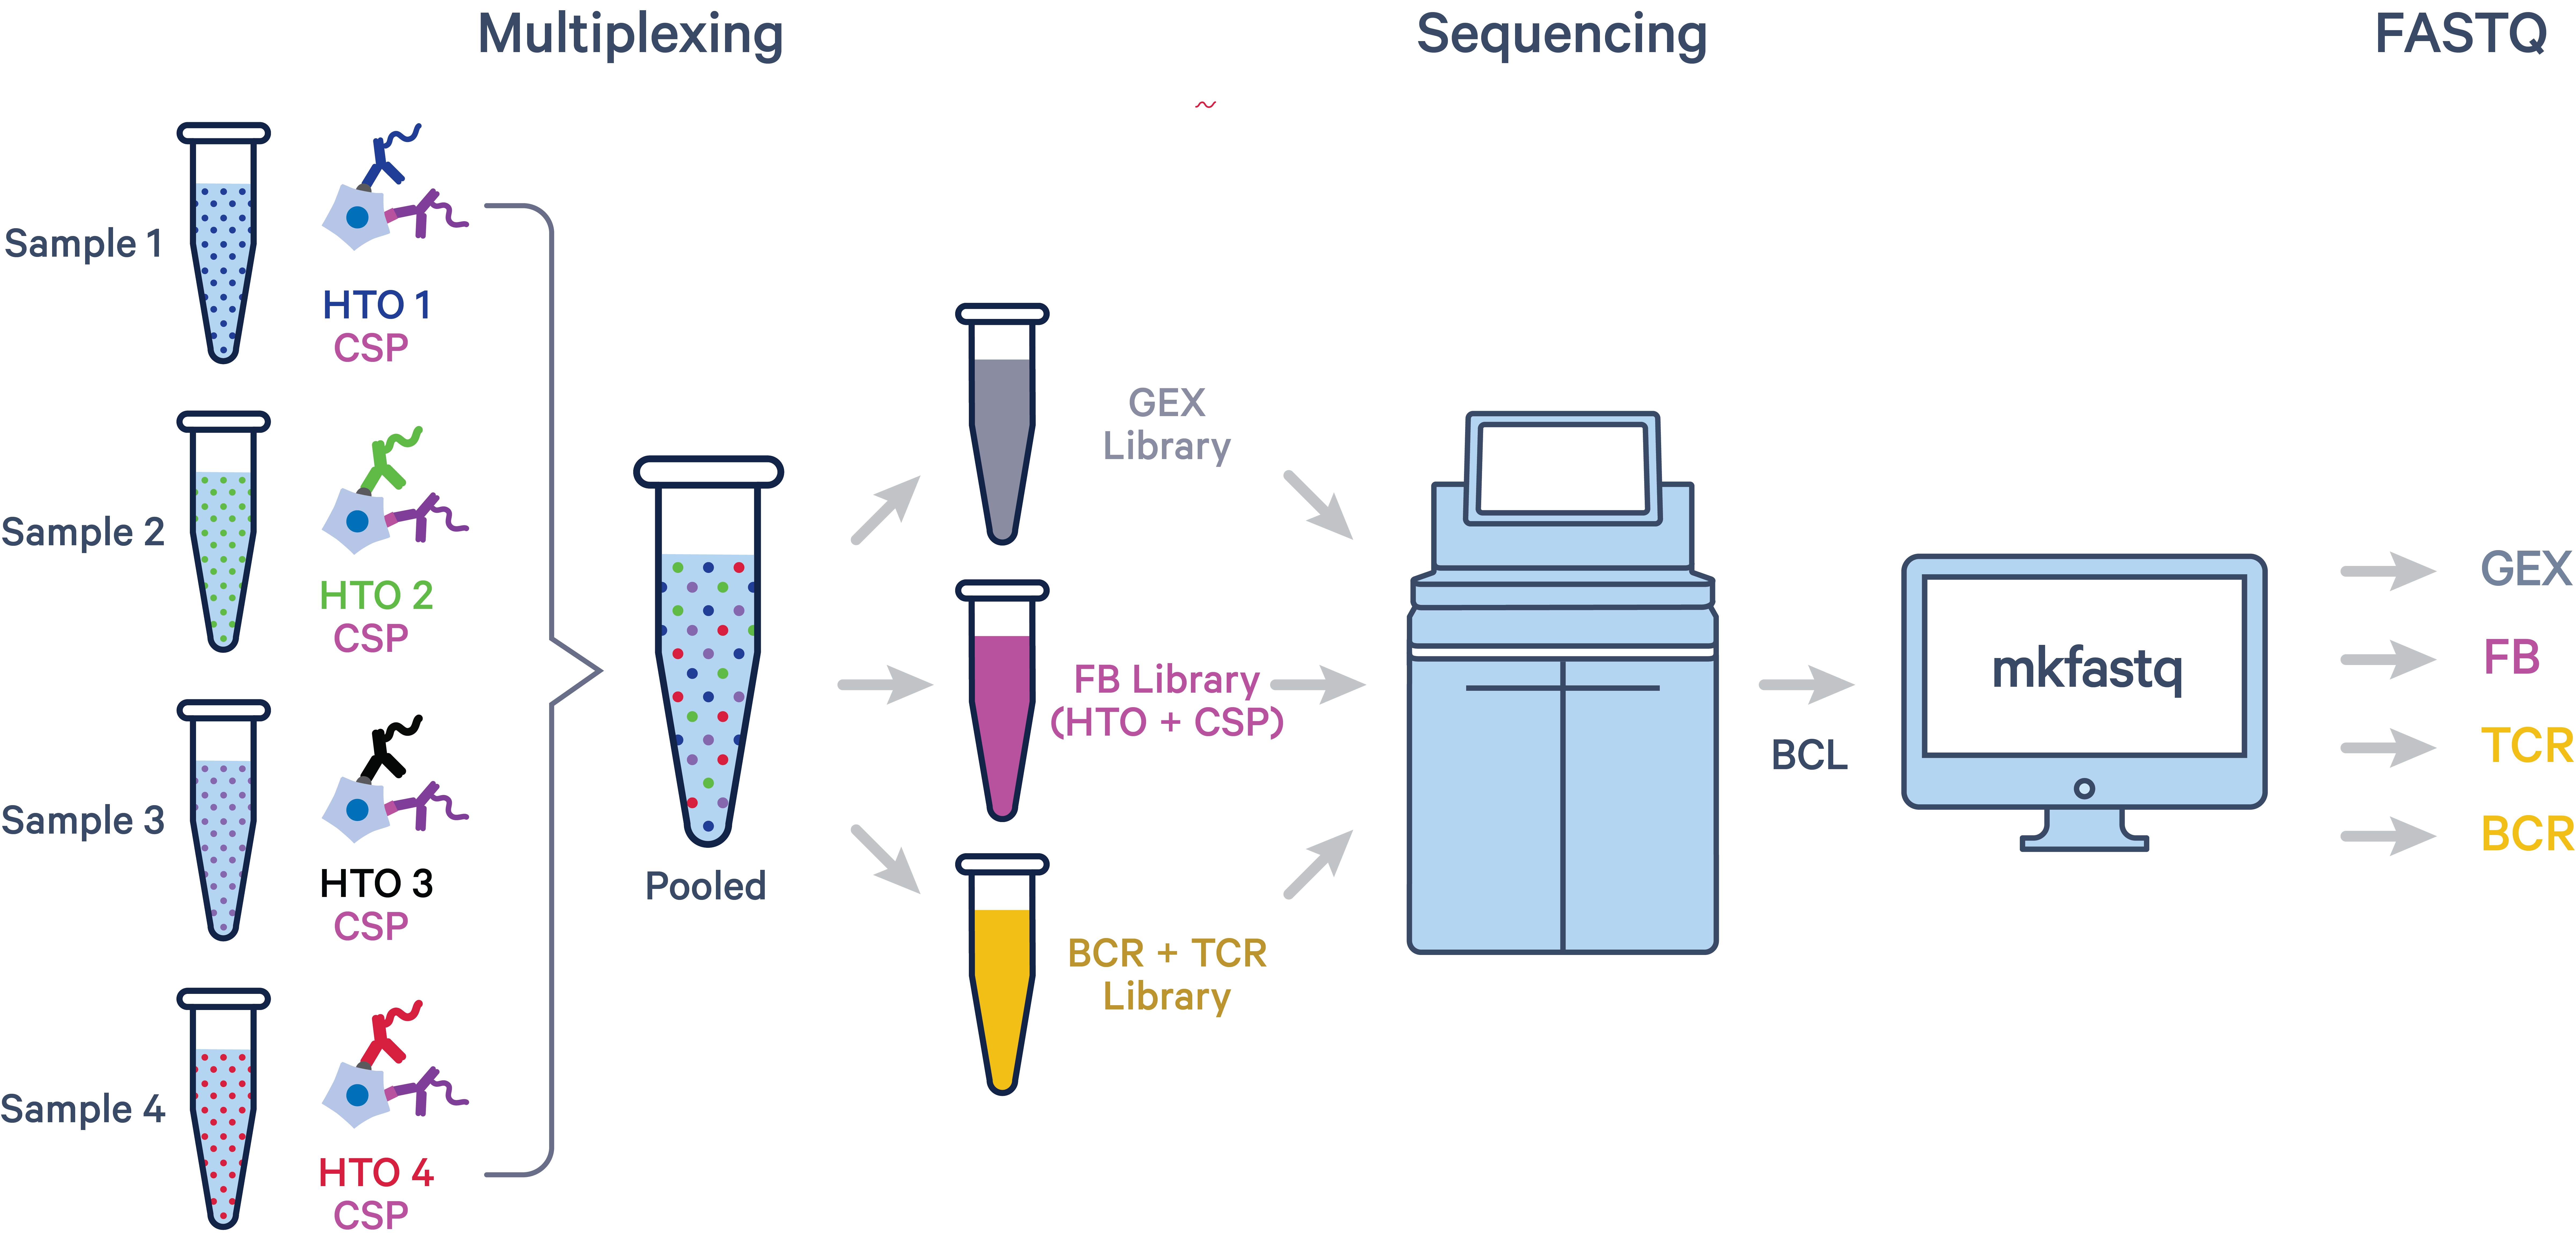
Four samples were collected from four individual donors. Each sample was incubated with a panel of cell surface protein (CSP) antibodies (shown in purple). Each sample also carries a unique hashtag antibody (color-coded by sample) for demultiplexing. Since the FB library contains both the CSP and hashtag oligos (HTO), the subset of the FB containing the hashtag oligos is equivalent to the 3' Cell Multiplexing Oligo (CMO) library.
After pooling, four libraries were created: Gene Expression (GEX), Feature Barcode Antibody Capture (FB), T cell receptor (TCR), and B cell receptor (BCR).
All input FASTQs, config files, and outputs generated in this tutorial are available on the Demultiplexing 5’ Immune Profiling Libraries Pooled with Hashtags dataset page.
Start this tutorial by downloading the example FASTQ files. In your working directory, make a new directory called fastqs and cd into it:
# Command to make the new directory
mkdir fastqs
# Command to change directory
cd fastqs
Run these curl commands to download the FASTQ files:
# GEX FASTQs
curl -O https://s3-us-west-2.amazonaws.com/10x.files/samples/cell-vdj/7.0.0/5p_hashing_demux/5p_hashing_demux_gex_fastq.tar
# Antibody FASTQs
curl -O https://s3-us-west-2.amazonaws.com/10x.files/samples/cell-vdj/7.0.0/5p_hashing_demux/5p_hashing_demux_ab_fastq.tar
# TCR FASTQs
curl -O https://s3-us-west-2.amazonaws.com/10x.files/samples/cell-vdj/7.0.0/5p_hashing_demux/5p_hashing_demux_tcr_fastq.tar
# BCR FASTQs
curl -O https://s3-us-west-2.amazonaws.com/10x.files/samples/cell-vdj/7.0.0/5p_hashing_demux/5p_hashing_demux_bcr_fastq.tar
5p_hashing_demux_gex_fastq.tar is a large file (171 GB) and may take >30 minutes to download. 5p_hashing_demux_ab_fastq.tar is 26 GB, 5p_hashing_demux_tcr_fastq.tar is 19 GB, and 5p_hashing_demux_bcr_fastq.tar is 11 GB.
Decompress the files and check their contents:
# Decompress command
tar -xvf 5p_hashing_demux_gex_fastq.tar
tar -xvf 5p_hashing_demux_ab_fastq.tar
tar -xvf 5p_hashing_demux_tcr_fastq.tar
tar -xvf 5p_hashing_demux_bcr_fastq.tar
# List contents
ls -lh
You should see four directories:
gex_fastqab_fastqtcr_fastqbcr_fastq
Navigate back to your working directory:
cd ..
Download the human reference transcriptome and decompress it. The reference is 10 GB and can take ~5 minutes.
# Download
curl -O https://cf.10xgenomics.com/supp/cell-exp/refdata-gex-GRCh38-2020-A.tar.gz
# Decompress command:
tar -xvzf refdata-gex-GRCh38-2020-A.tar.gz
Using the ls -lh command, confirm that a directory named refdata-gex-GRCh38-2020-A has appeared in your working directory. If you wish, you may delete the compressed version of the file: refdata-gex-GRCh38-2020-A.tar.gz.
As a reminder, the pooled libraries contain four samples each. Each sample is tagged with unique HTOs. In the demultiplexing step, you will use cellranger multi to assign cells back to individual samples. The workflow is shown here:

Step 1.1: Custom CMO reference
The CMO reference (or cmo-set) is similar to the feature_refence CSV used by Cell Ranger to describe Feature Barcodes. The one difference is that the feature_type column must have Multiplexing Capture as the Feature Barcode.
The 5' workflow uses hash antibodies instead of CMOs for multiplexing. Since the software pipeline for demultiplexing is co-opted from the 3’ CellPlex workflow, there are some references to CMOs in the config file.
In your working directory, make a new directory called demultiplexing
# Command to make new directory
mkdir demultiplexing
# Command to change directory
cd demultiplexing
Download the 5p_hashing_demux_cmo-set.csv by running this command:
curl -O https://cf.10xgenomics.com/samples/cell-vdj/7.0.0/5p_hashing_demux/5p_hashing_demux_cmo-set.csv
Alternatively, you may use your text editor of choice (e.g. nano) to create a file called 5p_hashing_demux_cmo-set.csv. Then copy and paste this information into the file:
id,name,read,pattern,sequence,feature_type
Hash-tag1,Hash-tag1,R2,^NNNNNNNNNN(BC)NNNNNNNNN,GTCAACTCTTTAGCG,Multiplexing Capture
Hash-tag2,Hash-tag2,R2,^NNNNNNNNNN(BC)NNNNNNNNN,TGATGGCCTATTGGG,Multiplexing Capture
Hash-tag3,Hash-tag3,R2,^NNNNNNNNNN(BC)NNNNNNNNN,TTCCGCCTCTCTTTG,Multiplexing Capture
Hash-tag4,Hash-tag4,R2,^NNNNNNNNNN(BC)NNNNNNNNN,AGTAAGTTCAGCGTA,Multiplexing Capture
While modifying the steps in this tutorial for your own dataset, be sure to edit this CSV file with your own CMO oligo sequences used in your experiment. The id and name fields can also be customized for your own experiment.
Step 1.2: Config CSV setup for Cell Ranger
We will use cellranger multi to demultiplex samples. The multi pipeline accesses library information from the config CSV.
The demultiplexing config CSV file must have the following sections:
[gene-expression]
- path to the reference transcriptome
- path to the custom CMO set (
5p_hashing_demux_cmo-set.csvshown above)
[libraries]
You only need two libraries here
- Path to GEX FASTQs: Only the GEX library is used for demultiplexing because the cell calling and tag calling algorithms of
cellranger multiwork best on the GEX library. V(D)J calls are often a subset of GEX cells calls. - Path to Multiplexing Capture FASTQs (Feature Barcode library)
[samples]
- Name of your samples
- Their corresponding hash-tags
Download the 5p_hashing_demux_config.csv file and customize it to include the specific paths on your system where files are located.
curl -O https://cf.10xgenomics.com/samples/cell-vdj/7.0.0/5p_hashing_demux/5p_hashing_demux_config.csv
Alternatively, a multi config CSV template is provided here. Copy and paste this text into a CSV file and name it 5p_hashing_demux_config.csv. Be sure to customize the paths to your specific library FASTQs, human reference transcriptome, and CMO-set. Absolute paths are required.
[gene-expression]
reference,/path/to/cellranger/prebuilt/human/refdata-gex-GRCh38-2020-A/
cmo-set,/path/to/working-directory/demultiplexing/5p_hashing_demux_cmo-set.csv
[libraries]
fastq_id,fastqs,feature_types
PBMC-ALL_60k_universal_HashAB1-4_BL_4tags_Rep1_gex,Path/to/GEX/FASTQs,Gene Expression
PBMC-ALL_60k_universal_HashAB1-4_BL_4tags_Rep1_ab,Path/to/AB/FASTQs,Multiplexing Capture
[samples]
sample_id,cmo_ids
Donor1_healthy,Hash-tag1
Donor2_healthy,Hash-tag2
Donor3_ALLpatient,Hash-tag3
Donor4_ALLpatient,Hash-tag4
Step 1.3: Run the demultiplexing command
First, add cellranger to your $PATH so that the executable file can be invoked from any directory.
# Command to change directory to the directory in which the Cell Ranger executable lives:
cd /path/to/cellranger-7.0.0/
# Command to put Cell Ranger in your $PATH:
export PATH=${PWD}:$PATH
This command can be used to return to the most recent previous directory, /path/to/working-directory/demultiplexing/:
cd -
Or, you can directly change directly back to your working directory:
cd /path/to/working-directory
Run the cellranger multi command:
cellranger multi --id=demultiplexed_samples --csv=5p_hashing_demux_config.csv
Here, the --id argument specifies the name of the output directory, and the --csv flag tells cellranger where to look for the config CSV file.
After several minutes, the command ends with a message similar to:
Waiting 6 seconds for UI to do final refresh.
Pipestance completed successfully!
2022-08-12 14:20:29 Shutting down.
Saving pipestance info to "demultiplexed_samples/demultiplexed_samples.mri.tgz"
You should see a directory named demultiplexed_samples (specified by the --id flag of the multi command). Per-sample information (demultiplexed) can be found in the demultiplexed_samples/outs/per_sample_outs directory. There should be four directories:
Donor1_healthyDonor2_healthyDonor3_ALLpatientDonor4_ALLpatient
You will need these directories in the later steps of this tutorial.
Step 1.4: Find and record the number of cells called per sample
Each donor directory produced in the previous step contains a web_summary.html file. Open this file in your web browser and retrieve the number of cells called for each sample. It should look like this:

Record the number of cells called per sample for use in later steps:
Donor1_healthy= 11,638Donor2_healthy= 8,873Donor3_ALLpatient= 9,024Donor4_ALLpatient= 7,032
Note on web summary alerts
The "Unsupported combination of 5' chemistry with multiplexing" warning indicates that this pipeline was developed for 3’ Single Cell Gene Expression workflows, and is not officially supported for 5’ Immune Profiling. Similar warnings also appear in the “Libraries” tab of the web summary. These warnings do not indicate problems with the analysis. Please note that if such an alert appears in any other context (unrelated to demultiplexing 5’ Cell Multiplexing libraries), it must not be ignored.
The "High Fraction Unrecognized CMO Sequences" warning in the multiplexing library indicates that there is a large fraction of unrecognized antibody reads.
A large fraction of unrecognized antibody reads is expected in the context of this analysis since the 5p_hashing_demux_cmo-set.csv only includes hashing antibody-derived tags. There are additional antibodies in the library that are not represented in the 5p_hashing_demux_cmo-set.csv. TotalSeq™-C antibodies likely make up the remaining (unrecognized) reads (~ 70%).
Please note that if this alert appears in any other context (unrelated to demultiplexing 5’ cell hashing libraries), it must not be ignored.
Step 1.5: Find and record the total number of reads sequenced
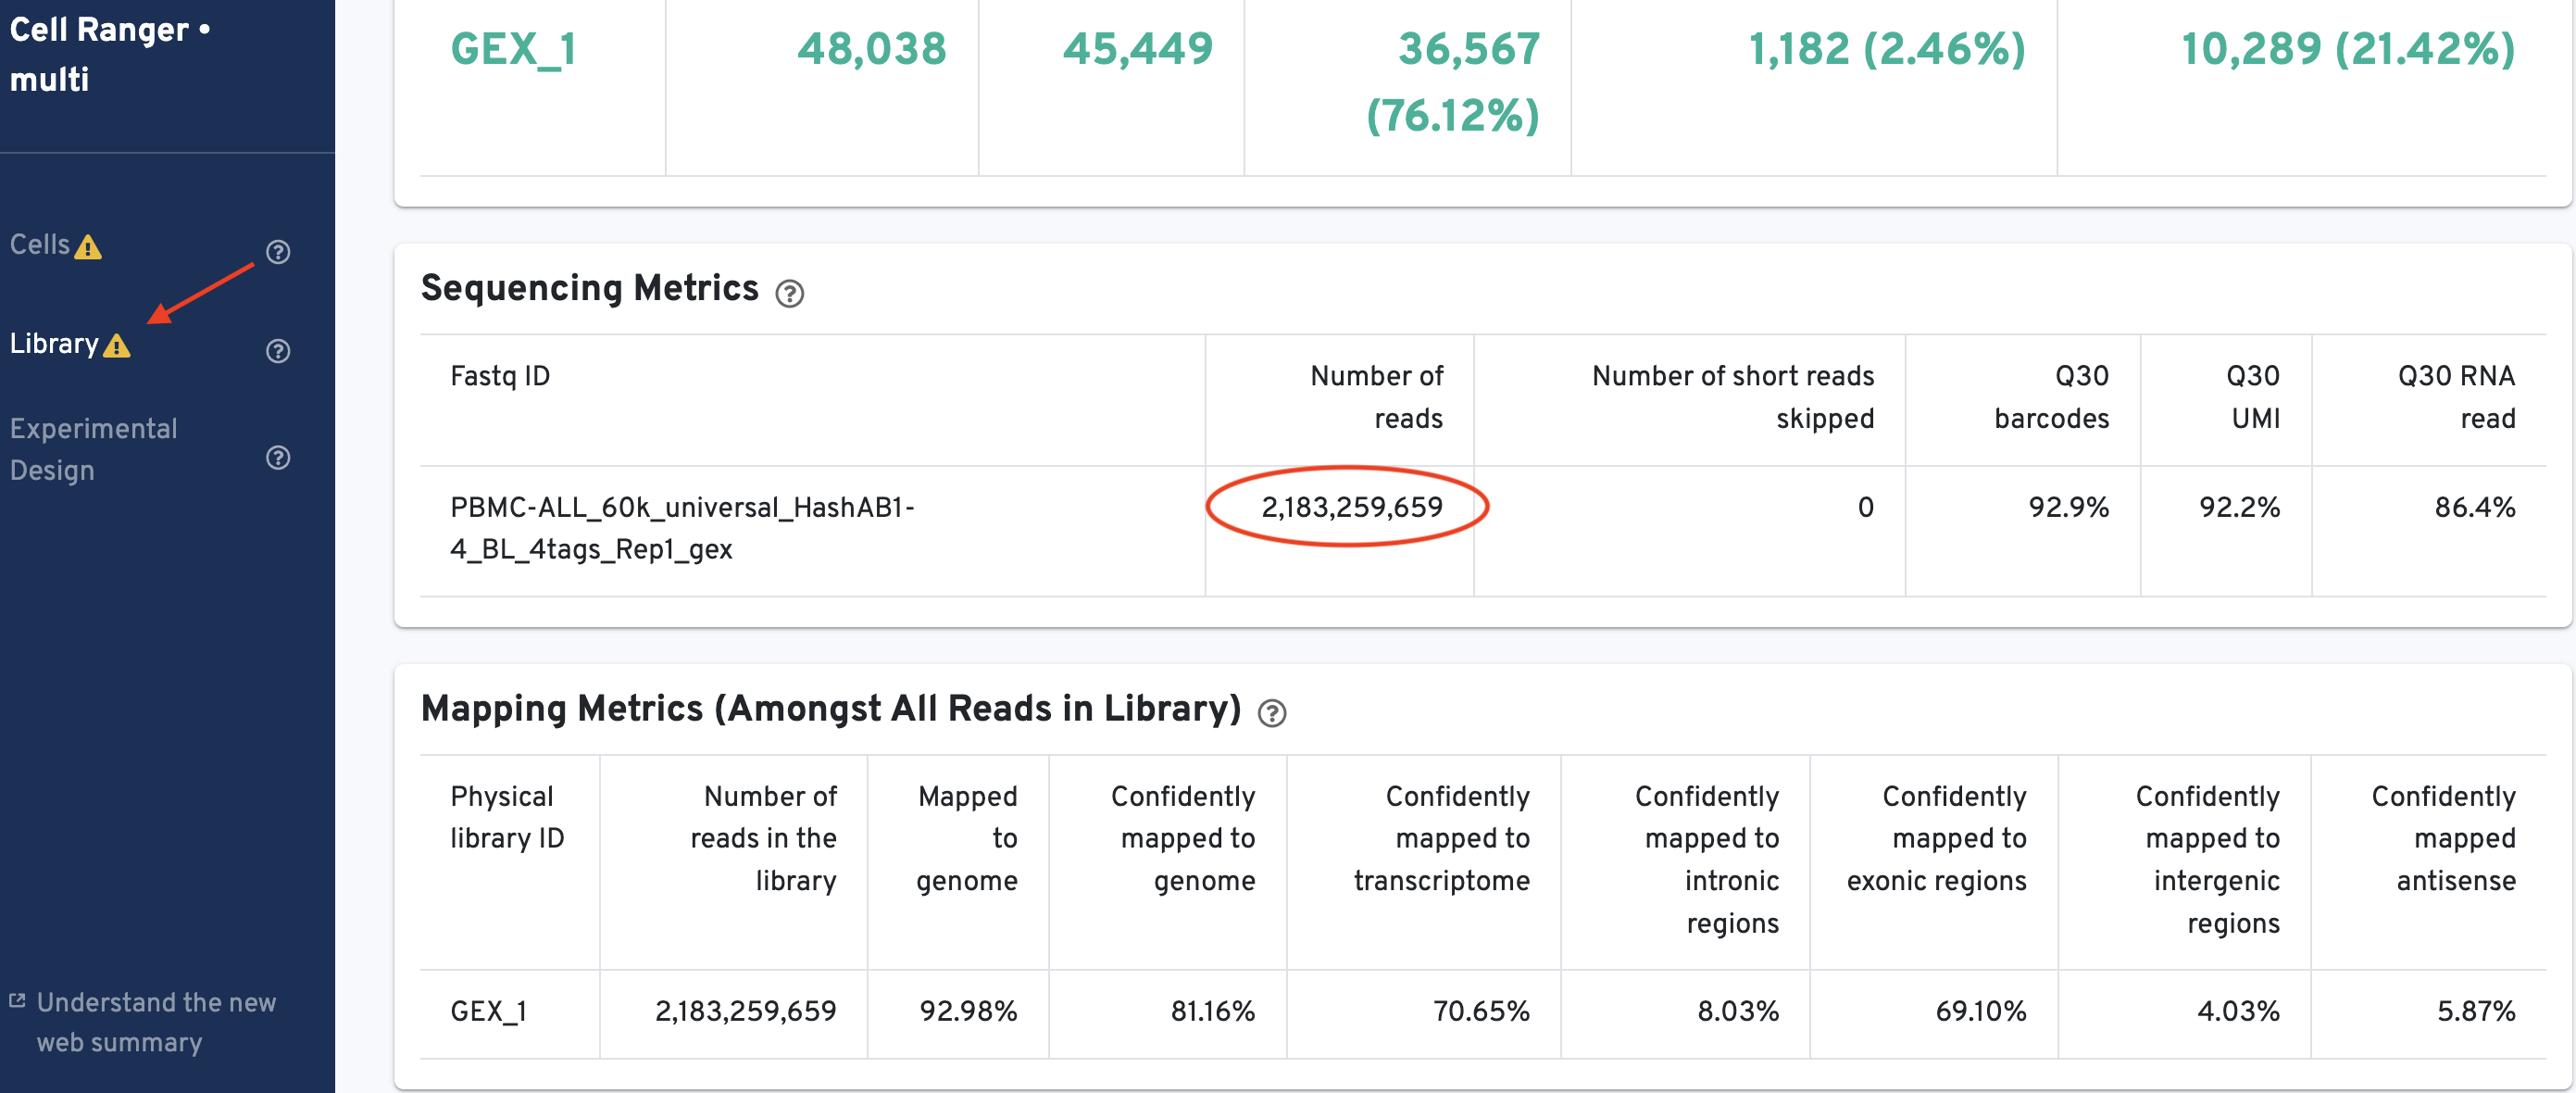
The total number of reads sequenced can be obtained from the 'Library' tab of the GEX web_summary.html. Look under the Sequencing Metrics section shown here:

There are 2,183,259,659 reads in the library.

In Step 1.3, you created BAM files for individual samples in the pool. Those BAM files are named sample_alignments.bam and are located in these individual directories:
Donor1_healthy:
/working-directory/demultiplexing/demultiplexed_samples/outs/per_sample_outs/Donor1_healthy/count
Donor2_healthy:
/working-directory/demultiplexing/demultiplexed_samples/outs/per_sample_outs/Donor1_healthy/count
Donor3_ALLpatient:
/working-directory/demultiplexing/demultiplexed_samples/outs/per_sample_outs/Donor3_ALLpatient/count
Donor4_ALLpatient:
/working-directory/demultiplexing/demultiplexed_samples/outs/per_sample_outs/Donor4_ALLpatient/count
Since cellranger multi requires FASTQ files as the input, you must convert the BAM files back to per individual FASTQ files. This conversion can be done with the bamtofastq software tool.
bamtofastq is bundled with cellranger. Run these commands to put bamtofastq into your $PATH:
# Command to change to the directory where the Cell Ranger executable file lives and put it in your $PATH:
cd /path/to/cellranger-7.0.0/
export PATH=${PWD}:$PATH
# Command to put other tools bundled with Cell Ranger in your path:
source /path/to/cellranger-7.0.0/sourceme.bash
Then go back to your working directory:
cd /path/to/working-directory
Make a new directory called bamtofastq:
# Command to make the directory
mkdir bamtofastq
# Command to enter the directory
cd bamtofastq
Step 2.1: Run bamtofastq
You will need the path to the individual sample_alignments.bam from Step 1.4. In addition, we recommend setting the --reads-per-fastq= argument higher than the total number of reads recorded in Step 1.5 (so that the output FASTQ files are not split into chunks by bamtofastq). In this tutorial, we use 2200000000 (rounded up from 2,183,259,659).
bamtofastq --reads-per-fastq=2200000000 /path/to/working-direcotry/demultiplexing/demultiplexed_samples/outs/per_sample_outs/Donor1_healthy/count/sample_alignments.bam /path/to/working-directory/bamtofastq/Donor1_healthy
bamtofastq --reads-per-fastq=2200000000 /path/to/working-directory/demultiplexing/demultiplexed_samples/outs/per_sample_outs/Donor2_healthy/count/sample_alignments.bam /path/to/working-directory/bamtofastq/Donor2_healthy
bamtofastq --reads-per-fastq=2200000000 /path/to/working-directory/demultiplexing/demultiplexed_samples/outs/per_sample_outs/Donor3_ALLpatient/count/sample_alignments.bam /path/to/working-directory/bamtofastq/Donor3_ALLpatient
bamtofastq --reads-per-fastq=2200000000 /path/to/working-directory/demultiplexing/demultiplexed_samples/outs/per_sample_outs/Donor4_ALLpatient/count/sample_alignments.bam /path/to/working-directory/bamtofastq/Donor4_ALLpatient
Each successful run should look like this:
bamtofastq v1.4.1
Writing finished. Observed 276670781 read pairs. Wrote 276670781 read pairs
Step 2.2: Identify the FASTQ directory corresponding to GEX
The output for bamtofastq will give you two directories per sample (or donor). Look inside each sample directory like this:
cd /path/to/working-directory/bamtofastq/Donor1_healthy
ls -ltsh
Expected output:
user_prompt$ ls -ltsh
total 4.0K
0 drwxr-xr-x. 2 user_prompt unix_consultants 286 Aug 15 14:37 demultiplexed_samples_1_1_HW7WGDSX3
4.0K drwxr-xr-x. 2 user_prompt unix_consultants 4.0K Aug 15 14:24 demultiplexed_samples_0_1_HW7KMDSX3
Which directory corresponds to the GEX library? You will use samtools to answer this question.
samtools is part of the cellranger bundle. Source it with a command similar to:
source /path/to/cellranger-7.0.0/sourceme.bash
Now run samtools on the sample_alignments.bam file located inside one of the individual sample output directories (e.g. Donor1_healthy) that were generated in Step 1.4:
samtools view -H /working-directory/demultiplexing/demultiplexed_samples/outs/per_sample_outs/Donor1_healthy/count/sample_alignments.bam
Running this command will produce several lines of output. Look for these lines at the bottom:
@CO library_info:{"library_id":0,"library_type":"Gene Expression","gem_group":1,"target_set_name":null}
@CO library_info:{"library_id":1,"library_type":"Multiplexing Capture","gem_group":1,"target_set_name":null}
As you can see, the directory labeled with “0” is GEX and the directory labeled with “1” is the FB library. We will use the “0” directory in the next step.
Please note that the order of the libraries depends on the order that the libraries are listed in 5p_hashing_demux_config.csv (Step 1.3). In this tutorial, the GEX library is listed before Multiplexing Capture. If you put the Multiplexing Capture library first, library_ids will be reversed. It is always good to check!
In the final step, you will combine the TCR, BCR, and FB data into the analysis with the per-sample GEX data. This will require four separate runs of cellranger multi, one per sample.
In your working directory, make a new directory called final_analysis:
# Command to make the directory
mkdir /path/to/working-directory/final-analysis
# Command to change directory
cd /path/to/working-directory/final-analysis
You will run the final analysis in this directory.
Step 3.1: Download the V(D)J reference
To process V(D)J data, you will need to specify the path to a V(D)J reference. Download the human (GRCh38) V(D)J reference from the 10x Genomics website:
# Download command:
curl -O https://cf.10xgenomics.com/supp/cell-vdj/refdata-cellranger-vdj-GRCh38-alts-ensembl-7.0.0.tar.gz
# Decompress command:
tar -xzvf refdata-cellranger-vdj-GRCh38-alts-ensembl-7.0.0.tar.gz
Step 3.2: Download the Feature Reference CSV
You will also need a feature reference CSV that declares the molecule structure and unique FB sequence of the FB library.
To download it into the final-analysis directory, run:
curl -O https://cf.10xgenomics.com/samples/cell-vdj/7.0.0/Donor1_final_Multiplex/Donor1_final_Multiplex_count_feature_reference.csv
Step 3.3: Create sample-specific multi config CSV files
Setup the config CSV files. You need the number of cells called in Step 1.4. Use that number to set the --force-cells parameter for each sample.
Donor1_healthy= 11,638Donor2_healthy= 8,873Donor3_ALLpatient= 9,024Donor4_ALLpatient= 7,032
In the final-analysis directory, download the config CSV templates for each sample and customize them.
# Download commands:
curl -O https://cf.10xgenomics.com/samples/cell-vdj/7.0.0/Donor1_final_Multiplex/Donor1_final_Multiplex_config.csv
curl -O https://cf.10xgenomics.com/samples/cell-vdj/7.0.0/Donor2_final_Multiplex/Donor2_final_Multiplex_config.csv
curl -O https://cf.10xgenomics.com/samples/cell-vdj/7.0.0/Donor3_final_Multiplex/Donor3_final_Multiplex_config.csv
curl -O https://cf.10xgenomics.com/samples/cell-vdj/7.0.0/Donor4_final_Multiplex/Donor4_final_Multiplex_config.csv
# List files to check if it worked:
ls -lah
Alternatively, you may choose to use your text editor of choice (e.g. nano) to create four new CSV files. Copy and paste the highlighted code block into each new file and name it accordingly:
- Donor1_final_Multiplex_config.csv
[gene-expression]
reference,working-directory/refdata-gex-GRCh38-2020-A/
force-cells,11638
check-library-compatibility,false
[feature]
reference,working-directory/final-analysis/feature_reference.csv
[vdj]
reference,working-directory/final-analysis/refdata-cellranger-vdj-GRCh38-alts-ensembl-7.0.0
[libraries]
fastq_id,fastqs,feature_types
bamtofastq,working-directory/bamtofastq/Donor1_healthy/demultiplexed_samples_0_1_HW7KMDSX3,Gene Expression
PBMC_60k_10x_4tags_Rep1_Ab,working-directory/fastqs/ab_fastq,Antibody Capture
PBMC_60k_10x_4tags_Rep1_TCR,working-directory/fastqs/tcr_fastq,VDJ-T
PBMC_60k_10x_4tags_Rep1_BCR,working-directory/fastqs/bcr_fastq,VDJ-B
- Donor2_final_Multiplex_config.csv
[gene-expression]
reference,working-directory/refdata-gex-GRCh38-2020-A/
force-cells,8873
check-library-compatibility,false
[feature]
reference,working-directory/final-analysis/feature_reference.csv
[vdj]
reference,working-directory/final-analysis/refdata-cellranger-vdj-GRCh38-alts-ensembl-7.0.0
[libraries]
fastq_id,fastqs,feature_types
bamtofastq,working-directory/bamtofastq/Donor2_healthy/demultiplexed_samples_0_1_HW7KMDSX3,Gene Expression
PBMC_60k_10x_4tags_Rep1_Ab,working-directory/fastqs/ab_fastq,Antibody Capture
PBMC_60k_10x_4tags_Rep1_TCR,working-directory/fastqs/tcr_fastq,VDJ-T
PBMC_60k_10x_4tags_Rep1_BCR,working-directory/fastqs/bcr_fastq,VDJ-B
- Donor3_final_Multiplex_config.csv
[gene-expression]
reference,working-directory/refdata-gex-GRCh38-2020-A/
force-cells,9024
check-library-compatibility,false
[feature]
reference,working-directory/final-analysis/feature_reference.csv
[vdj]
reference,working-directory/final-analysis/refdata-cellranger-vdj-GRCh38-alts-ensembl-7.0.0
[libraries]
fastq_id,fastqs,feature_types
bamtofastq,working-directory/bamtofastq/Donor1_healthy/demultiplexed_samples_0_1_HW7KMDSX3,Gene Expression
PBMC_60k_10x_4tags_Rep1_Ab,working-directory/fastqs/ab_fastq,Antibody Capture
PBMC_60k_10x_4tags_Rep1_TCR,working-directory/fastqs/tcr_fastq,VDJ-T
PBMC_60k_10x_4tags_Rep1_BCR,working-directory/fastqs/bcr_fastq,VDJ-B
- Donor4_final_Multiplex_config.csv
[gene-expression]
reference,path/to/cellranger/prebuilt/human/refdata-gex-GRCh38-2020-A/
force-cells,7032
check-library-compatibility,false
[feature]
reference,/path/to/feature_ref.csv
[vdj]
reference,/path/to/vdj/refdata-cellranger-vdj-GRCh38-alts-ensembl-7.0.0
[libraries]
fastq_id,fastqs,feature_types
bamtofastq,/path/to/bamtofastq_outs_v1.4/Donor4_ALLpatient/PBMC_60k_10x_4tags_Rep1_step1_v7_0_1_HMW77DSX3,Gene Expression
PBMC_60k_10x_4tags_Rep1_Ab,/path/to/Ab-fastqs,Antibody Capture
PBMC_60k_10x_4tags_Rep1_TCR,/path/to/Ab-fastqs/TCR,VDJ-T
PBMC_60k_10x_4tags_Rep1_BCR,/path/to/Ab-fastqs/BCR/,VDJ-B
Step 3.4: Run Cell Ranger multi for each sample
Within the final-analysis directory, run cellranger multi four times, once per sample:
cellranger multi --id=Donor1-final --csv=Donor1_final_Multiplex_config.csv
cellranger multi --id=Donor2-final --csv=Donor2_final_Multiplex_config.csv
cellranger multi --id=Donor3-final --csv=Donor3_final_Multiplex_config.csv
cellranger multi --id=Donor4-final --csv=Donor4_final_Multiplex_config.csv
Each run will start with a message similar to:
Running preflight checks (please wait)...
2022-08-16 14:37:01 [runtime] (ready) ID.Donor3-final.SC_MULTI_CS.PARSE_MULTI_CONFIG
2022-08-16 14:37:28 [runtime] (chunks_complete) ID.Donor3-final.SC_MULTI_CS.PARSE_MULTI_CONFIG
If the run completed successfully, you will see a message like this:
Waiting 6 seconds for UI to do final refresh.
Pipestance completed successfully!
2022-08-16 15:37:08 Shutting down.
Saving pipestance info to "Donor1-final/Donor1-final.mri.tgz"
When all the runs are complete, you will see four output directories: Donor1-final, Donor2-final, Donor3-final, Donor4-final
Outputs are in the outs/ directory located within each output directory. The file and directory structure within (generated with the tree command) should look similar to this:
user_prompt$ tree -L 3
.
├── config.csv
├── multi
│ ├── count
│ │ ├── feature_reference.csv
│ │ ├── raw_cloupe.cloupe
│ │ ├── raw_feature_bc_matrix
│ │ ├── raw_feature_bc_matrix.h5
│ │ ├── raw_molecule_info.h5
│ │ ├── unassigned_alignments.bam
│ │ └── unassigned_alignments.bam.bai
│ ├── vdj_b
│ │ ├── all_contig_annotations.bed
│ │ ├── all_contig_annotations.csv
│ │ ├── all_contig_annotations.json
│ │ ├── all_contig.bam
│ │ ├── all_contig.bam.bai
│ │ ├── all_contig.fasta
│ │ ├── all_contig.fasta.fai
│ │ └── all_contig.fastq
│ └── vdj_t
│ ├── all_contig_annotations.bed
│ ├── all_contig_annotations.csv
│ ├── all_contig_annotations.json
│ ├── all_contig.bam
│ ├── all_contig.bam.bai
│ ├── all_contig.fasta
│ ├── all_contig.fasta.fai
│ └── all_contig.fastq
├── per_sample_outs
│ └── Donor1-final
│ ├── count
│ ├── metrics_summary.csv
│ ├── vdj_b
│ ├── vdj_t
│ └── web_summary.html
└── vdj_reference
├── fasta
│ ├── donor_regions.fa
│ └── regions.fa
└── reference.json
12 directories, 28 files
Each run produces a web_summary.html file, which is the initial point of reference with metrics for sample performance. Refer to this 10x Genomics Web Summary Technical Note for more information.
Note on web summary alerts
The "Low Fraction Antibody Reads Usable" alert seen for the Antibody library is to be expected in the context of this analysis since only a small percentage of antibody reads are used when analyzing cells from a single sample (out of four samples) in the entire library. Given our experimental design, this alert does not indicate an error. Please note that if this alert appears in any other context (unrelated to demultiplexing 5’ cell hashing libraries), it must not be ignored.
Note on web summary barcode rank plots
The GEX data barcode rank plots should deviate from our usual recommendation. In the final analysis, the input FASTQ files are generated using BAM files of the demultiplexed data. Since cell calling on the GEX library has already happened in the demultiplexing step, there are no background barcodes/empty GEMs to filter out.
An unusual GEX barcode rank plot in any other context (unrelated to demultiplexing 5’ Cell Multiplexing libraries) must not be ignored.
The barcode rank plot for the Antibody libraries may also look unusual. This could be because a subset of barcodes corresponds to one sample, and only a small percentage of the barcodes are being "called" from the total antibody library.
An unusual antibody barcode rank plot in any other context (unrelated to demultiplexing 5’ Cell Multiplexing libraries) must not be ignored.
Learn more about output files on the 5' Immune Profiling Software Support website.